Table of contents
Understanding the Basics of Braising Chuck Roast
What Is Braising?
Cooking chuck roast by combining dry and wet heat is known as braising. In order to seal in the juices and produce a tasty crust, this method starts by searing the chuck roast over high heat. The chuck roast is then cooked slowly at a low temperature in a liquid, like wine or broth.
Chuck roast is braised in order to soften the stiff connective fibers that are present in this meat cut. A rich and luscious dish is produced because the meat has time to absorb the flavors of the liquid and seasonings due to the lengthy cooking time.
Tough chunks of meat can be made tender and flavourful with the age-old technique of braising. Making the most of a cheap cut of meat while simultaneously producing a tasty supper is what happens when you braise a chuck roast.
Why Choose Chuck Roast?
When deciding to braise a chuck roast, you’re selecting one of the most flavorful and economical cuts of beef. Chuck roast comes from the shoulder region of the cow, which contains a high level of connective tissue. While this tissue makes chuck roast unsuitable for quick cooking methods, it’s ideal for braising.
As you braise a chuck roast, the heat and liquid work together to break down collagen into gelatin, creating a tender, juicy texture. This transformation is what makes braising such a reliable method for preparing chuck roast.
Additionally, braising chuck roast allows you to create a versatile dish. The meat can take on the flavors of the braising liquid and spices, making it suitable for a variety of recipes. Whether you’re preparing a classic pot roast or experimenting with global flavors, chuck roast is the perfect candidate for braising.
Tools and Ingredients Needed for Braising Chuck Roast
Essential Equipment
To properly braise a chuck roast, you’ll need a few key tools. A heavy-bottomed Dutch oven is the preferred choice for its ability to distribute heat evenly and retain moisture. If you don’t have a Dutch oven, a deep skillet with a lid or a slow cooker can also be used to braise a chuck roast effectively.
Using a meat thermometer is also crucial when you braise a chuck roast. It ensures that the roast reaches an internal temperature of 190°F to 205°F, where the connective tissues fully break down.
Key Ingredients
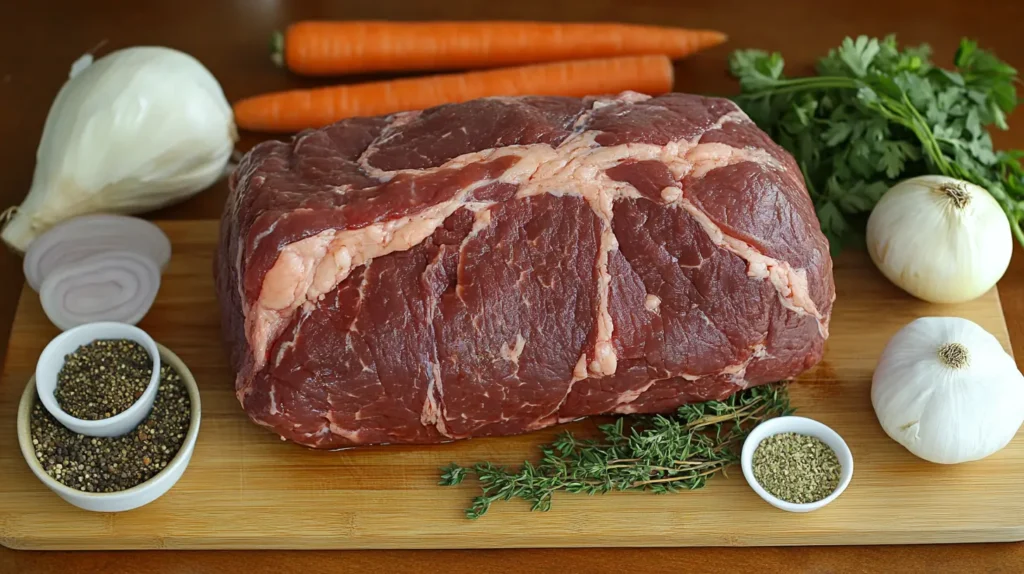
- Chuck Roast: Choose a well-marbled cut to ensure a moist and tender result.
- Seasonings: Salt, pepper, and optional spices such as paprika or garlic powder enhance the flavor of the chuck roast.
- Braising Liquid: Use beef broth, wine, or water to braise a chuck roast and add flavor.
- Aromatics: Vegetables like onions, carrots, and celery create a flavorful base.
- Herbs and Spices: Include thyme, rosemary, or bay leaves to elevate the dish.
With the right tools and ingredients, braising chuck roast becomes an approachable and rewarding cooking method. The result is a tender and flavorful meal that highlights the versatility of this classic cut of beef.
Step-by-Step Guide to Braise Chuck Roast

Preparing the Chuck Roast
The key to a perfect braised chuck roast is preparation. First, choose a 3 to 5 pound chunk of chuck roast, preferably with good marbling. As the beef cooks, its fat will render, adding moisture and flavour.
Let the meat rest for about half an hour at room temperature before starting. Even cooking is ensured by this procedure. Using paper towels, pat the chuck roast dry since too much moisture can prevent it from scorching. Season the roast on all sides with a large amount of salt and freshly ground black pepper. For an added flavour boost, you can also use other spices like onion powder, garlic powder, or paprika.
You can marinade the meat for a few hours or overnight as an optional addition. To give the roast more depth, make a simple marinade with olive oil, vinegar, minced garlic, and fresh herbs.
Searing the Meat
Searing is a critical step that builds a flavorful crust on the meat. Begin by preheating a heavy-bottomed pot, such as a Dutch oven, over medium-high heat. Add a small amount of oil with a high smoke point, such as vegetable or canola oil, to the pot.
Once the oil shimmers, place the seasoned chuck roast into the pot. Avoid crowding the pot to ensure a proper sear. Allow the meat to brown undisturbed for about 3 to 4 minutes on each side. This step develops the Maillard reaction, which enhances the overall flavor of the dish. Be patient, as this process sets the stage for a rich, savory taste.
Remove the seared roast from the pot and set it aside. You’ll notice browned bits, known as fond, left on the bottom of the pot. These are packed with flavor and will be deglazed in the next step.
Braising Techniques and Times
Once the chuck roast is seared, the braising process begins. Start by deglazing the pot to lift the flavorful fond from the bottom. Pour a small amount of your chosen braising liquid, such as beef broth, wine, or water, into the pot. Use a wooden spoon to scrape up the browned bits.
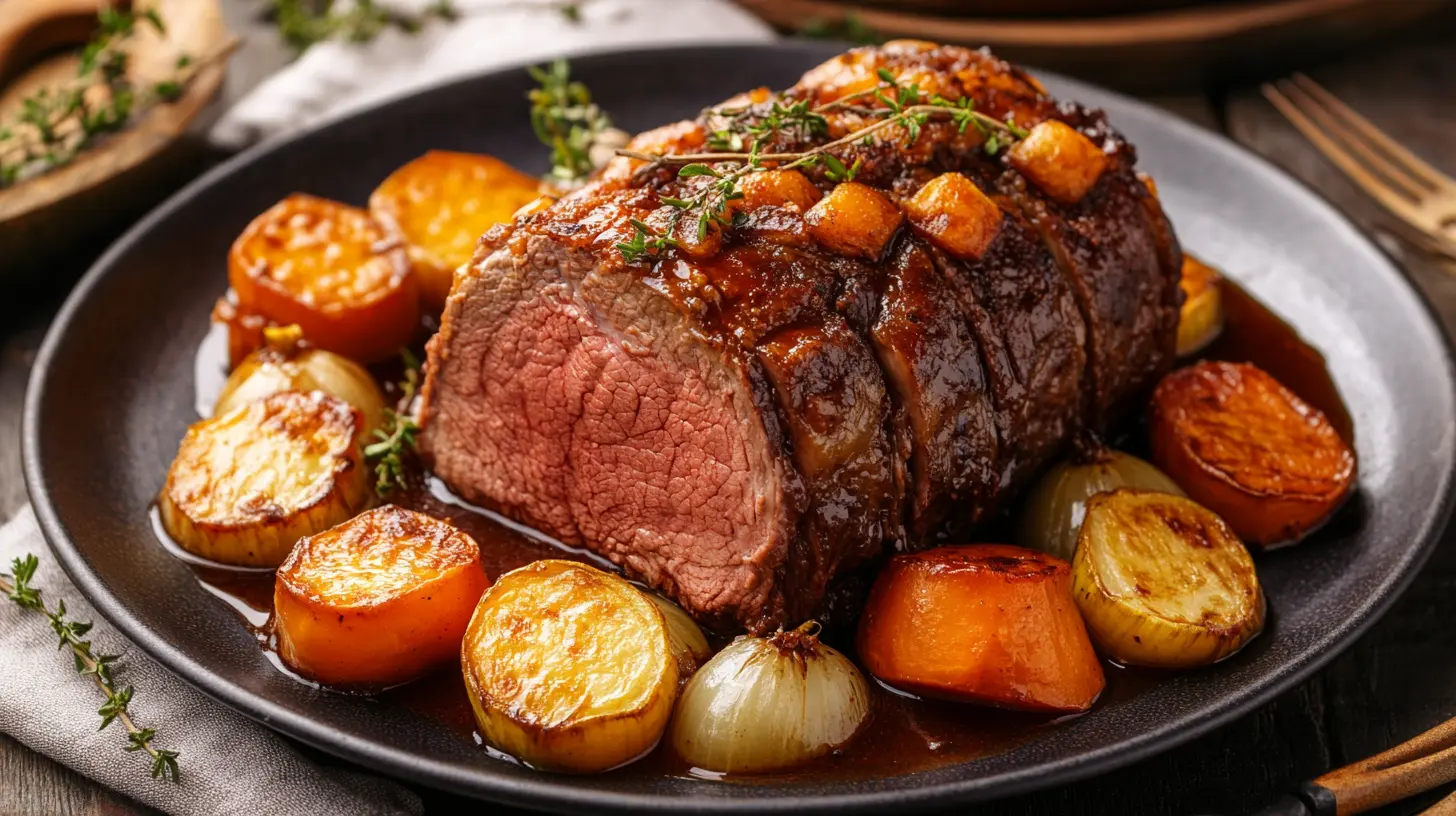
Return the seared chuck roast to the pot and add enough liquid to cover the roast halfway. For an aromatic flavor base, add vegetables like onions, carrots, and celery along with herbs such as thyme, rosemary, or bay leaves.
Cover the pot tightly with a lid to lock in moisture and place it in a preheated oven set to 300°F (150°C). Alternatively, you can simmer the pot on the stovetop over low heat. The cooking time will vary depending on the size of the roast. Generally, allow 2 to 3 hours for a 3-pound roast, or 3 to 4 hours for larger cuts.
To check for doneness, insert a fork into the meat. The chuck roast is fully braised when it is fork-tender and easily pulls apart. For precise results, an internal temperature of 190°F to 205°F (88°C to 96°C) ensures the connective tissues have broken down completely.
This step-by-step guide ensures a perfectly braised chuck roast every time. Let me know if you’d like me to expand further or proceed with the other sections!
For additional tips and tricks to perfect this process, refer to The Ultimate Guide to Braised Chuck Roast. This resource offers in-depth advice to ensure your chuck roast turns out perfectly every time.
Factors That Influence Braising Time

Meat Thickness and Size
The size and thickness of your chuck roast significantly affect how long it will take to braise. A larger, thicker cut requires more time for the heat and moisture to penetrate the meat and break down its tough connective tissues.
For instance, a chuck roast weighing 3 pounds typically takes about 2 to 3 hours to braise. A larger roast, such as one weighing 5 pounds, may require 3 to 4 hours or more. To ensure even cooking, it’s essential to rotate the roast halfway through the cooking process, especially if it’s not fully submerged in the braising liquid.
When in doubt, rely on the fork test: insert a fork into the meat and twist gently. If it pulls apart easily, the roast is done. Remember, the goal is tenderness, not just cooking through.
Liquid Selection and Quantity
The final product and cooking time can also be affected by the type and amount of braising liquid used. In addition to adding moisture, liquids such as wine, chicken stock, beef broth, or even a combination of these provide the meat flavour.
At least one-third to half of the roast should be submerged in the liquid. Insufficient usage of liquid might cause the meat to dry up and lengthen the cooking time since heat transfer is less efficient. However, an excessive amount of liquid can weaken the flavours.
Throughout the braising process, it is imperative to keep an eye on the liquid level. Add more liquid as necessary if it evaporates too soon. A tight-fitting cover keeps the cooking environment steady and aids in moisture retention.
Oven Temperature Variations
The braising time is greatly influenced by the oven temperature. Although 275°F to 325°F (135°C to 163°C) is generally the best temperature range for braising, even little changes can have a significant impact.
Although it takes longer to cook at a lower temperature (275°F), the meat is incredibly tender. To get a melt-in-your-mouth feel and break down tight connective tissues, this “low and slow” method works well.
A higher temperature, such as 325°F, on the other hand, reduces cooking time but necessitates more careful supervision to avoid overcooking or drying out the meat. The temperature you choose will depend on your goals and schedule. For chuck roast, lower temperatures usually produce the finest results.
You may guarantee a consistently excellent braised chuck roast by taking into account variables like the meat’s size, the kind and quantity of liquid, and the cooking temperature.
Troubleshooting, FAQs, and Serving Suggestions
Common Braising Issues and Fixes
Even with a tried-and-true method, challenges can arise while braising chuck roast. Here are common issues and how to address them:
- Meat Is Too Tough: If your chuck roast isn’t tender after the recommended cooking time, it likely needs more time. The connective tissues may not have fully broken down. Cover the pot and continue braising, checking every 30 minutes.
- Dry or Overcooked Meat: This usually happens when there isn’t enough liquid in the pot. Always ensure the roast is at least partially submerged. Use a tight-fitting lid to prevent excessive evaporation.
- Lack of Flavor: If the dish tastes bland, the problem may lie in the seasoning. Enhance flavors by adding salt, spices, or fresh herbs toward the end of the cooking process. Deglazing the pot properly at the start also helps infuse depth.
These simple fixes can elevate your braised chuck roast to perfection.
Frequently Asked Questions (FAQs)
How long should I braise chuck roast per pound?
Plan for about 1 hour of braising per pound at 300°F. For example, a 4-pound roast will take approximately 4 hours.
Can I use a slow cooker for braising?
Yes, a slow cooker works well for braising. Set it on low for 6 to 8 hours or on high for 4 to 5 hours. The meat should be fork-tender when done.
Is it better to braise with the lid on or off?
Always braise with a tight-fitting lid to retain moisture and maintain even cooking. If the liquid level gets too high, you can partially remove the lid toward the end to allow reduction.
How do I store and reheat braised chuck roast?
Store leftovers in an airtight container in the refrigerator for up to 3 days. Reheat gently on the stovetop with a bit of liquid to prevent drying out.
Serving Ideas for Chuck Roast
A perfectly braised chuck roast is versatile and pairs well with various side dishes. Here are some ideas:
- Classic Pairings: Mashed potatoes, roasted vegetables, or buttered egg noodles are traditional complements that soak up the flavorful juices.
- Creative Leftovers: Shred the meat for tacos, sandwiches, or shepherd’s pie. Use the braising liquid as a rich base for soups or stews.
- Fresh Sides: Serve alongside a crisp green salad or steamed asparagus to balance the hearty flavors of the roast.
These serving suggestions allow you to enjoy the chuck roast in multiple ways, making it a dish worth the effort.